App Environments: Prod/Staging/Dev/Multi-tenant
Section titled “App Environments: Prod/Staging/Dev/Multi-tenant”Create and manage unlimited staging, testing, and production environments for your Sherpa.sh applications with branch-based deployments and environment-specific configurations.
Overview
Section titled “Overview”When you import a project to Sherpa.sh, a default Production environment is automatically created from your repository's default branch (typically main or master). You can create unlimited additional environments on any paid plan, each with its own configuration, environment variables, and deployment settings.
Key Benefits
Section titled “Key Benefits”- Unlimited Environments: Unlike other platforms that charge per environment, Sherpa.sh includes unlimited environments on all paid plans
- Branch-Based Deployments: Each environment deploys from a specific branch in your repository
- Isolated Configurations: Each environment maintains its own environment variables and settings
- Automatic Deployments: Configure automatic deployments on commits or pull requests
- Custom Domains: Each environment gets a unique subdomain on sherpa.software plus support for custom domains
Creating a New Environment
Section titled “Creating a New Environment”Follow these steps to create additional environments for your application:
Step 1: Navigate to Applications Page
Section titled “Step 1: Navigate to Applications Page”From your application dashboard, click the "New Environment" button on the Applications page.

Step 2: Configure Environment Settings
Section titled “Step 2: Configure Environment Settings”Name your environment and select the branch you want to deploy from:
- Environment Name: Choose a descriptive name (e.g.,
staging,testing,development) - Source Branch: Select the Git branch this environment will track and deploy from

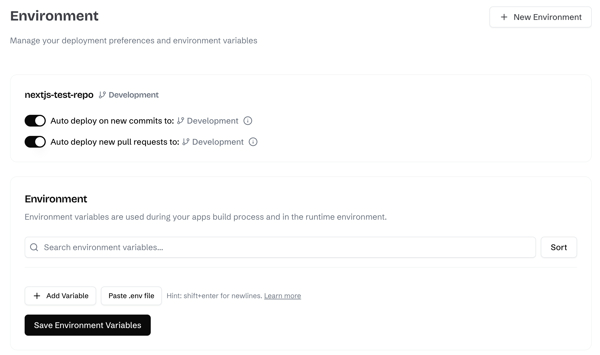
Step 3: Add Environment Variables
Section titled “Step 3: Add Environment Variables”Configure environment-specific variables for your new environment:
Step 4: Deploy
Section titled “Step 4: Deploy”Your environment is now ready to deploy! Click "Start New Deployment" to trigger your first deployment.
Multi-Tenancy Configuration
Section titled “Multi-Tenancy Configuration”🏢 Multi-Tenancy Use Case: Deploy multiple isolated instances of your application for different clients using environment-specific configurations.
Sherpa.sh's unlimited environments make it ideal for multi-tenant applications. Create separate production environments for each tenant with isolated configurations:
Example: Multi-Tenant SaaS Setup
Section titled “Example: Multi-Tenant SaaS Setup”
Each tenant environment:
- Deploys from the same codebase (
mainbranch) - Maintains completely isolated data and configurations for each customer (
customer-1,customer-2,customer-3) - Can have custom domains (customer1.yourapp.com, customer2.yourapp.com, customer3.yourapp.com)
- Updates simultaneously when you push to main
Common Environment Patterns
Section titled “Common Environment Patterns”Standard Development Workflow
Section titled “Standard Development Workflow”main branch → Production Environmentdevelop branch → Staging Environmentfeature/* branches → Development/Testing EnvironmentsGitFlow Pattern
Section titled “GitFlow Pattern”main branch → Productionrelease/* branches → Stagingdevelop branch → Developmenthotfix/* branches → Hotfix EnvironmentBest Practices
Section titled “Best Practices”- Environment Naming: Use clear, consistent naming conventions (
production,staging,testing,dev-john) - Variable Management: Never commit sensitive environment variables to your repository. Use Sherpa.sh's environment variable interface.
- Branch Protection: Set up branch protection rules in your Git provider to prevent accidental pushes to production branches.
- Testing Pipeline: Create a testing environment that automatically deploys pull requests for QA review.
- Rollback Strategy: Keep staging environments on the same deployment schedule as production for accurate testing.